Now that your time entries have been captured automatically, let's quickly categorize these entries to your Timesheet. And the quickest way is to have Chrometa do the heavy lifting automatically!
By setting up keyword-based rules, you can "teach" Chrometa how to create most of your Timesheet for you each day. Which means you'll only need to do some quick cleanup and annotations...resulting in the most comprehensive and accurate timesheet you've ever created. So that you can get paid for ALL of your time (aka hard work).
How to Categorize Time Entries Automatically
Say we have a client named Acme and we always want to categorize entries that contain the keyword Acme to a corresponding Client & Project.
We do this by creating a Rule that tells Chrometa: "Whenever you see the keyword 'Acme', I want you to categorize it to the Acme project."
We can even categorize time entries retroactively - so that instead of using the Move To Project dropdown to categorize entries, we could instead create a rule to have everything automatically bucketed for us.
Creating a New Rule
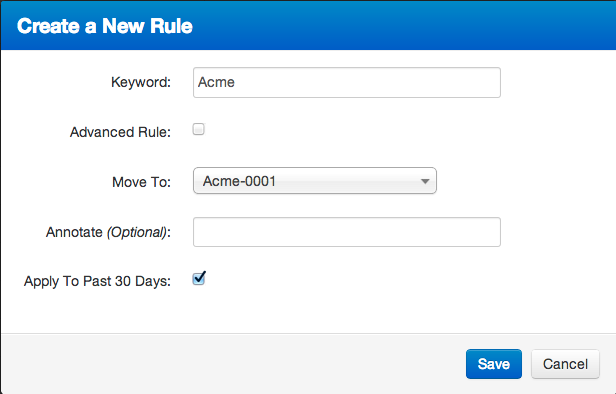
First, let's tell Chrometa what to look for. In our example here, we're telling Chrometa to look for the keyword Acme in our captured time entries - and to categorize them to our Acme-001 project when it finds them.
We can also enter a URL, or part of one, as a keyword.
The Keyword field can contain keywords separated by OR and AND
Filing OR procedure OR work
This will apply to time entries containing ANY of the three keywords
Filing AND procedure AND work
This will apply to time entries containing ALL of the three keywords
If you want all iTunes work categorized under a personal category, check Advanced Rule and enter itunes in the Application name
If you want all "Away" time categorized under a personal category, check Advanced Rule and enter pause in the Application name
The Annotate field, which is optional, allows us to make an annotation to the time entry as it's categorized.
Finally, if we want to apply this rule to previous time entries, we'd click the Apply To Past checkbox, and we'll apply the rule retroactively to time entries.
Shortcut for Rule Creation
The easiest way to create a new rule on the fly is to use our "And Create Rule" shortcut button.
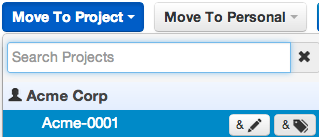
To access this shortcut, first check the box to select a particular time entry from the Summary or Timeline view. Then select the Move To Project dropdown, and mouse over the project you want to move this entry to.
Before you left-click to categorize the entry, click the mouseover button at the far-right called & Create Rule.
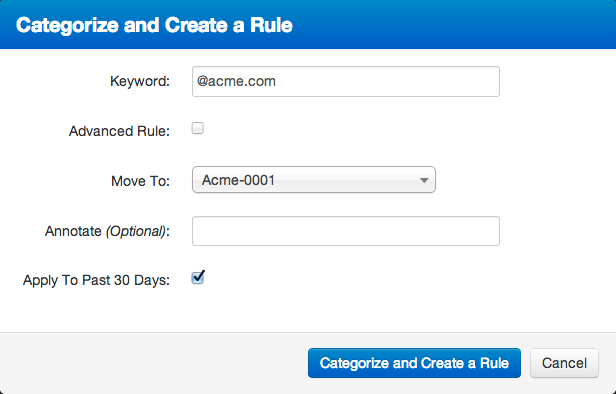
This button will bring up the Rule Creation screen, with the Keyword already filled in (based on the entry you had selected). You can then modify the keyword (ie. remove extra text), and click Categorize and Create a Rule to not only categorize this time entry, but also create a rule based on the original entry (or whatever you modified it to).
Example 1: Email Time Entries
Here's an example. As you probably know, Chrometa provides advanced email time capture support for Microsoft Outlook (Windows & Mac), Gmail (via Chrome and Firefox), and Mac Mail. This means in addition to the Subject Line and Time Spent on each individual email, Chrometa will capture the To/From information as well.
This allows you to create rules based on email domains - such as 'acme.com' from our example - to make sure that all email correspondence with a certain client or company is automatically categorized for you.
For example, we recommend using a Basic Rule, with Keyword:
- @acme.com --> To categorize all email correpondence with this company to the Acme-001 project.
- brett@acme.com --> To categorize all email correspondence with this person only (not the entire company) to the project.

Example 2: Smartphone Calls
Our Android users know that Chrometa for Android will match the phone number from each call with the corresponding Google Contact (if available) to create the time entry. Which means you can create a Rule on your contact's name to have your phone calls with them automatically assigned to their project.
Phone numbers can be used in most format as keywords. You can enter 1-888-407-4747, +1 888 407 4747 or 18884074747
Chrometa for iPhone users can likewise create rules based on the phone number itself. (The same goes for BlackBerry and Windows Phone users as well).

FAQ: Are Rules Case Sensitive?
Advanced Rule Creation
Before you begin this section, please let me reiterate that we do recommend using a Basic rule only! :)
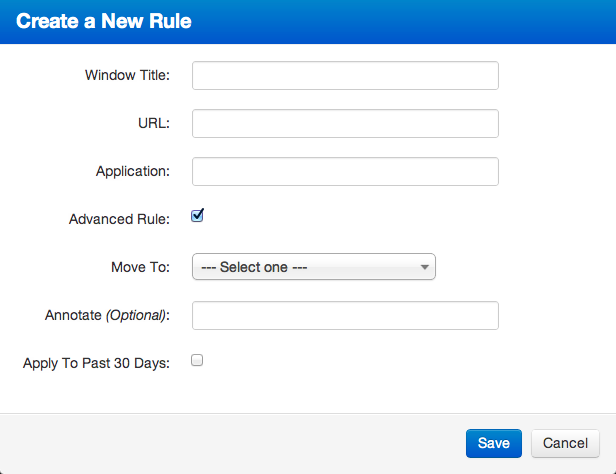
Clicking the Advanced Rule checkbox will give us up to 3 fields to specify your search criteria. If we leave a field blank, it will just act as a wild card. For you boolean logic fans, think of it as an AND condition between the fields - where a blank entry indicates the aforementioned wild card.
URL - For websites (but remember that if you only need to match up a URL and nothing else, a Basic rule will do fine).
Using Boolean Operators AND, OR
- If you use multiple keywords separated by AND (case SENSITIVE), Chrometa will check if the entry contains all the keywords.
- If you use multiple keywords separated by OR (case SENSITIVE), Chrometa will check if the entry contains any of the keywords.
- If you use multiple keywords surrounded by double quotes, Chrometa will check if the entry is the exact phrase.
Comments
0 comments
Article is closed for comments.